I expect this is an easy fix, and a novice question…
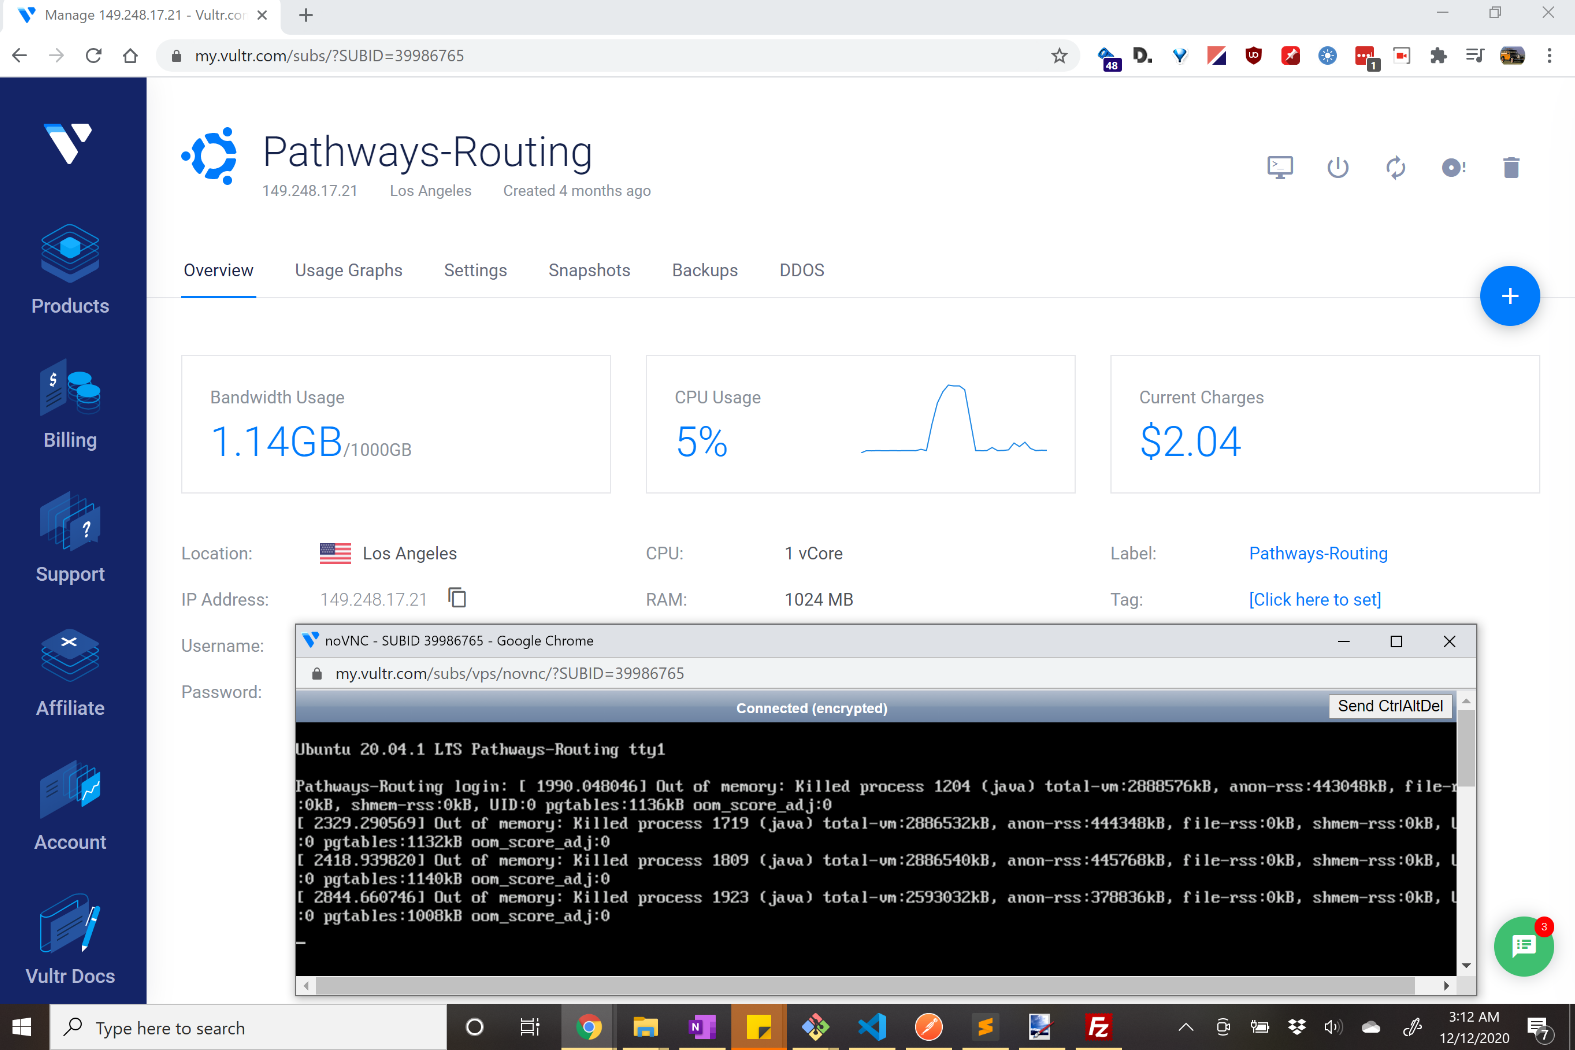
So I deployed graphhopper to a Vultr.com Unbuntu 20.04 x64 server and it operates perfectly well, but seems to crash every few days. I followed the deploy documentation, but am very elementary at server-side development - and likely overlooking an elementary detail. What is causing the crash and/or is there a way to automatically run the startup script command? The log files don’t seem to have any detail on the crashes other than logging the route requests which all seem normal.
Details:
- Input region was 11MB city-sized
osm.pbffile - Using Graphhopper 1.0
- Graphs on my local computer and uploaded to server
- My Vultr.com server-space…
- Ubuntu 20.04 x64
- 1vCore
- RAM: 1024MB
- Storage: 25GB
- Bandwidth: usually less than ~1 GB out of 1000 GB per month
When starting graphhopper I run:
export JAVA_OPTS="-server -Xconcurrentio -Xmx512m -Xms512m"
./graphhopper.sh -a web -i ./data/TucsonMetro.osm.pbf -o ./data/TucsonMetro-gh -d --port 8989`
My config.yml file:
graphhopper:

  # OpenStreetMap input file PBF or XML, can be changed via command line -Ddw.graphhopper.datareader.file=some.pbf
  datareader.file: ""
  # Local folder used by graphhopper to store its data
  graph.location: graph-cache

  ##### Vehicles #####


  # More options: foot,hike,bike,bike2,mtb,racingbike,motorcycle,car4wd,wheelchair (comma separated)
  # bike2 takes elevation data into account (like up-hill is slower than down-hill) and requires enabling graph.elevation.provider below.
  graph.flag_encoders: mtb|turn_costs=true, car|turn_costs=true #,  bike|turn_costs=true

  # Enable turn restrictions for car or motorcycle.
  # graph.flag_encoders: car|turn_costs=true

  # Add additional information to every edge. Used for path details (#1548), better instructions (#1844) and tunnel/bridge interpolation (#798).
  # Default values are: road_class,road_class_link,road_environment,max_speed,road_access (since #1805)
  # More are: surface,max_width,max_height,max_weight,max_axle_load,max_length,hazmat,hazmat_tunnel,hazmat_water,toll,track_type
  # graph.encoded_values: surface,toll,track_type

  ##### Routing Profiles ####

  # Routing can be done for the following list of profiles. Note that it is required to specify all the profiles you
  # would like to use here. The fields of each profile are as follows:
  # - name (required): a unique string identifier for the profile
  # - vehicle (required): refers to the `graph.flag_encoders` used for this profile
  # - weighting (required): the weighting used for this profile, e.g. fastest,shortest or short_fastest
  # - turn_costs (true/false, default: false): whether or not turn restrictions should be applied for this profile.
  #   this will only work if the `graph.flag_encoders` for the given `vehicle` is configured with `|turn_costs=true`.
  #
  # Depending on the above fields there are other properties that can be used, e.g.
  # - distance_factor: 0.1 (can be used to fine tune the time/distance trade-off of short_fastest weighting)
  # - u_turn_costs: 60 (time-penalty for doing a u-turn in seconds (only possible when `turn_costs: true`)).
  #   Note that since the u-turn costs are given in seconds the weighting you use should also calculate the weight
  #   in seconds, so for example it does not work with shortest weighting.
  # - custom_model_file: when you specified "weighting: custom" you need to set a yaml file that defines the custom_model.
  #   If you want an empty model you can also set "custom_model_file: empty".
  #
  #   For more information about profiles and especially custom profiles have a look into the documentation
  #   at docs/core/profiles.md or the examples under web/src/test/resources/com/graphhopper/http/resources/ or
  #   the CustomWeighting class for the raw details.
  #
  # To prevent long running routing queries you should usually enable either speed or hybrid mode for all the given
  # profiles (see below). Otherwise you should at least limit the number of `routing.max_visited_nodes`.
  profiles:
    - name: pathways1
      vehicle: mtb
      weighting: custom
      custom_model_file: pathways1.yml

    - name: pathways2
      vehicle: mtb
      weighting: custom
      custom_model_file: pathways2.yml

    - name: pathways3
      vehicle: mtb
      weighting: custom
      custom_model_file: pathways3.yml

    - name: pathways4
      vehicle: mtb
      weighting: custom
      custom_model_file: pathways4.yml

    - name: pathways5
      vehicle: mtb
      weighting: custom
      custom_model_file: pathways5.yml

    - name: pathways6
      vehicle: mtb
      weighting: shortest

    - name: co2car
      vehicle: car
      weighting: short_fastest

  #  - name: car_with_turn_costs
  #    vehicle: car
  #    weighting: short_fastest
  #    distance_factor: 0.1
  #    turn_costs: true
  #    u_turn_costs: 60

  # Speed mode:
  # Its possible to speed up routing by doing a special graph preparation (Contraction Hierarchies, CH). This requires
  # more RAM/disk space for holding the prepared graph but also means less memory usage per request. Using the following
  # list you can define for which of the above routing profiles such preparation shall be performed. Note that to support
  # profiles with `turn_costs: true` a more elaborate preparation is required (longer preparation time and more memory
  # usage) and the routing will also be slower than with `turn_costs: false`.
  profiles_ch:
    - profile: pathways1
    - profile: pathways2
    - profile: pathways3
    - profile: pathways4
    - profile: pathways5
    - profile: pathways6
    - profile: co2car
  #   - profile: car_with_turn_costs

  # Hybrid mode:
  # Similar to speed mode, the hybrid mode (Landmarks, LM) also speeds up routing by doing calculating auxiliary data
  # in advance. Its not as fast as speed mode, but more flexible.
  #
  # Advanced usage: It is possible to use the same preparation for multiple profiles which saves memory and preparation
  # time. To do this use e.g. `preparation_profile: my_other_profile` where `my_other_profile` is the name of another
  # profile for which an LM profile exists. Important: This only will give correct routing results if the weights
  # calculated for the profile are equal or larger (for every edge) than those calculated for the profile that was used
  # for the preparation (`my_other_profile`)
  profiles_lm: []

  ##### Elevation #####


  # To populate your graph with elevation data use SRTM, default is noop (no elevation). Read more about it in docs/core/elevation.md
  # graph.elevation.provider: srtm


  # default location for cache is /tmp/srtm
  # graph.elevation.cache_dir: ./srtmprovider/


  # If you have a slow disk or plenty of RAM change the default MMAP to:
  # graph.elevation.dataaccess: RAM_STORE


  # To enable bilinear interpolation when sampling elevation at points (default uses nearest neighbor):
  # graph.elevation.interpolate: bilinear


  # To increase elevation profile resolution, use the following two parameters to tune the extra resolution you need
  # against the additional storage space used for edge geometries. You should enable bilinear interpolation when using
  # these features (see #1953 for details).
  # - first, set the distance (in meters) at which elevation samples should be taken on long edges
  # graph.elevation.long_edge_sampling_distance: 60
  # - second, set the elevation tolerance (in meters) to use when simplifying polylines since the default ignores
  #   elevation and will remove the extra points that long edge sampling added
  # graph.elevation.way_point_max_distance: 10


  #### Speed, hybrid and flexible mode ####


  # To make CH preparation faster for multiple profiles you can increase the default threads if you have enough RAM.
  # Change this setting only if you know what you are doing and if the default worked for you.
  # prepare.ch.threads: 1

  # To tune the performance vs. memory usage for the hybrid mode use
  # prepare.lm.landmarks: 16

  # Make landmark preparation parallel if you have enough RAM. Change this only if you know what you are doing and if
  # the default worked for you.
  # prepare.lm.threads: 1

  # In many cases the road network consists of independent components without any routes going in between. In
  # the most simple case you can imagine an island without a bridge or ferry connection. The following parameter
  # allows setting a minimum size (number of nodes) for such detached components. This can be used to reduce the number
  # of cases where a connection between locations might not be found.
  prepare.min_network_size: 200


  ##### Routing #####


  # You can define the maximum visited nodes when routing. This may result in not found connections if there is no
  # connection between two points within the given visited nodes. The default is Integer.MAX_VALUE. Useful for flexibility mode
  # routing.max_visited_nodes: 1000000


  # If enabled, allows a user to run flexibility requests even if speed mode is enabled. Every request then has to include a hint ch.disable=true.
  # Attention, non-CH route calculations take way more time and resources, compared to CH routing.
  # A possible attacker might exploit this to slow down your service. Only enable it if you need it and with routing.maxVisitedNodes
  # routing.ch.disabling_allowed: true


  # If enabled, allows a user to run flexible mode requests even if the hybrid mode is enabled. Every such request then has to include a hint routing.lm.disable=true.
  # routing.lm.disabling_allowed: true

  # Control how many active landmarks are picked per default, this can improve query performance
  # routing.lm.active_landmarks: 4


  # You can limit the max distance between two consecutive waypoints of flexible routing requests to be less or equal
  # the given distance in meter. Default is set to 1000km.
  routing.non_ch.max_waypoint_distance: 1000000


  ##### Storage #####


  # configure the memory access, use RAM_STORE for well equipped servers (default and recommended)
  graph.dataaccess: RAM_STORE


  # will write way names in the preferred language (language code as defined in ISO 639-1 or ISO 639-2):
  # datareader.preferred_language: en


  # Sort the graph after import to make requests roughly ~10% faster. Note that this requires significantly more RAM on import.
  # graph.do_sort: true


  ##### Spatial Rules #####
  # Spatial Rules require some configuration and only work with the DataFlagEncoder.


  # Spatial Rules require you to provide Polygons in which the rules are enforced
  # The line below contains the default location for the files which define these borders
  # spatial_rules.borders_directory: core/files/spatialrules

  # You can define the maximum BBox for which spatial rules are loaded.
  # You might want to do this if you are only importing a small area and don't need rules for other countries.
  # Having less rules, might result in a smaller graph. The line below contains the world-wide bounding box, uncomment and adapt to your need.
  # spatial_rules.max_bbox: -180,180,-90,90


# Uncomment the following to point /maps to the source directory in the filesystem instead of
# the Java resource path. Helpful for development of the web client.
# Assumes that the web module is the working directory.
#
# assets:
#  overrides:
#    /maps: web/target/classes/assets/

# Dropwizard server configuration
server:
  application_connectors:
  - type: http
    port: 8989
    # for security reasons bind to localhost
#    bind_host: localhost
  request_log:
      appenders: []
  admin_connectors:
  - type: http
    port: 8990
#    bind_host: localhost
# See https://www.dropwizard.io/1.3.8/docs/manual/configuration.html#logging
logging:
  appenders:
  - type: file
    time_zone: UTC
    current_log_filename: logs/graphhopper.log
    log_format: "%d{YYYY-MM-dd HH:mm:ss.SSS} [%thread] %-5level %logger{36} - %msg%n"
    archive: true
    archived_log_filename_pattern: ./logs/graphhopper-%d.log.gz
    archived_file_count: 30
    never_block: true
  - type: console
    time_zone: UTC
    log_format: "%d{YYYY-MM-dd HH:mm:ss.SSS} [%thread] %-5level %logger{36} - %msg%n"
Thanks in advance!
Dylan